3rd Gen Toyota Tacoma LED Headlights How To Install
Whether you're upgrading to TRD Pro-style headlights or a full LED projector system, this installation blog will help you finish the job safely and correctly.

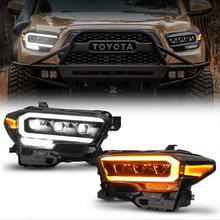
Upgrading to LED projector headlights is one of the best mods you can do for your Toyota Tacoma. In this guide, we’ll walk you through the full installation process based on a real installation video, including grille removal, headlight removal, wiring setup, and fuse connection.
Whether you're upgrading to TRD Pro-style headlights or a full LED projector system, this installation blog will help you finish the job safely and correctly.
Tools You Will Need
10 mm socket
10 mm ratchet
Trim removal tool
Fuse puller (included with your vehicle)
Gloves (optional)
Step 1 — Prepare the Vehicle
🔧 Rotate the Wheel Outward
Turn the front wheel outward to give yourself more room to access the inner fender and bumper clips.
🔧 Open the Hood
Lift the hood and secure it in place.
Step 2 — Remove the Front Grille
1️⃣ Remove Center Bolts
Using a 10 mm socket, remove the two bolts located at the center of the grille.

2️⃣ Remove Grille Clips
Use a trim removal tool to take out the two clips on both sides of the grille.

3️⃣ Disconnect the Sensor Connector
Grip the two clips holding the grille-top sensor connector.
Press and release the connector clip to unplug it.

Once the wiring harness is disconnected, you can now pull the entire grille off the vehicle.

Step 3 — Remove the Bumper & Clips
1️⃣ Remove the Bolt
Use a 10 mm ratchet and trim tool to remove the single bolt securing the bumper.

2️⃣ Release the Side Tab
Use your finger to push the plastic tab up and over the bumper edge.
Gently pull the bumper outward.

3️⃣ Remove the Plastic Clip
Use the trim tool to remove the plastic clip beneath the headlight.

Step 4 — Remove the Headlight Assembly
1️⃣ Disconnect Headlamp Connector
Unplug the main headlight connector. Remove the bottom 10 mm bolt located under the headlight.

2️⃣ Remove Top Bolts
Take out the two 10 mm bolts on top of the headlamp.

3️⃣ Remove the Six Plastic Clips
There are six plastic clips securing the bumper to the vehicle front:
4 clips on the radiator support
1 clip under each headlight
After this, you can safely pull out the entire headlamp.

4️⃣Unplug All Connectors
Disconnect all original wiring from the headlight.

Step 5 — Wiring Instructions
Before installing the headlight back into the vehicle, clean out any dry dust or dirt inside the housing area.
Color-Matched Main Connectors:
Connect the gray, black, and color-matched plugs from the harness to the matching connectors on the headlight.
Other Connectors:
All other connectors are simple plug-and-play.
Two connectors requires no wiring—just leave it plugged in as original.

Step 6 — Fuse Tap Connection
1️⃣Connect the black long-tube harness to the fuse tap.

2️⃣Insert the previously removed 10A fuse into the add-a-fuse harness.

Make sure to secure excess wiring away from:
Hot components
Moving parts
Step 7 — Install Lights Back on the Vehicle
Repeat the same process for the headlight on the other side.
Then reinstall:
-
The headlights
-
All clips
-
The bumper
-
The grille
-
The sensor connector
When everything is plugged back in, the installation is officially complete!
✅ Final Check
Before closing the hood, test the following:
Low beam
High beam
DRL
Sequential turn signals
Marker lights
Any additional functions your LED headlights include