

Covered connections.
A covered box and cable seals help organize and cover the accessory connections.
SP-CR115
No se pudo cargar la disponibilidad de retiro


SUPAREE'S FLAGSHIP SWITCH PANEL
LOCUSTake command of your off-road lights with SUPAREE's flagship 8-gang switch panel. Group your roof bar, ditch lights and work lights, link accessories to vehicle signals, and monitor the system in the app. Physical buttons keep everyday control within reach.
01EIGHT OUTPUTS. UP TO 40A ON ONE CHANNEL.
Use LOCUS as a 12V switch panel or connect it to a compatible 24V system. Assign each accessory to a channel suited to its current draw: up to 40A on CH1, with 30A, 20A, 15A and 10A outputs for the rest of your build. Keep the combined load within the 120A system limit.
Respect both the individual channel ratings and the total system limit. Choose accessories compatible with the supply voltage and allow for their operating requirements.
PLAN YOUR CHANNELS
Select a channel to explore its capacity.
Reduce the combined load to 120A or less.
Planning preview, not a live measurement. Example loads are illustrative; check your equipment's actual current draw.
02PHYSICAL CONTROL. APP FLEXIBILITY.
Use the physical panel for everyday auxiliary light control. Open the app to configure lighting groups, vehicle triggers and switch modes, or personalize its buttons with names, icons and photos. Live voltage, current and internal control-box temperature readings keep the electrical side of your setup in view.
CONTROL IT YOUR WAY
Use the panel's accessory buttons and dedicated power, brightness, DRL and group controls. Open the app when you want to customize how they work.
03ONE-BUTTON GROUP CONTROL
Put your roof bar, ditch lights and bumper pods in one group, then bring them on with a single press. Create another group for camp or work lighting. Linked outputs can share an action or run different assigned modes, so one button can control an entire lighting setup.
Assign your roof bar, ditch lights and bumper pods to one group. One press activates the assigned outputs.
One button. Multiple lights.
TRY A ONE-BUTTON GROUP
Group off
These are example groups you can configure. If groups share an output, the most recently activated group takes priority.
04THREE CONFIGURABLE VEHICLE-SIGNAL INPUTS
Link auxiliary lights to a compatible high-beam signal or configure rear-facing lights to come on with reverse. Three wired signal inputs let you choose the responding outputs and their actions. Once connected and configured, the vehicle control you already use can activate the accessories you need.
Connect a sensor input to a compatible high-beam signal. Assign the auxiliary outputs you want to respond when you operate that control.
High-beam signal > assigned auxiliary lights
Signal inactive
Requires compatible signals, wiring and configuration. When multiple inputs trigger the same output simultaneously, priority is Sensor 1, then Sensor 2, then Sensor 3.
05FOUR MODES FOR DIFFERENT JOBS
Use Toggle for lights that stay on, Momentary for an accessory that runs only while you hold the button, or Flash and Strobe for compatible lighting. Adjust Flash speed in the app and choose from eight Strobe patterns. Each output gets the behavior its job calls for.
Keep connected work or camp lights on until you switch them off. Use this mode for equipment that should stay active after a press.
Stays on until the next press
Try the button to preview this control behavior.
The indicator demonstrates a control concept, not an actual Flash speed or Strobe pattern. Use compatible lighting and permitted modes for your application.
06DEDICATED DRL CONNECTIONS
Connect compatible DRL or accent-light circuits to the dedicated terminal bank and operate them with the separate DRL button. Keep accent lighting independent from your main lights while leaving the eight main outputs available for other accessories. Want them to respond together? Add DRL to a programmed group.
DEDICATED ACCENT-LIGHT CONTROL
Give compatible DRL or accent-light circuits their own connection and control. Add accent lighting without using one of the eight main accessory outputs.
In Group Mode, use the group to control DRL with its assigned outputs; the separate DRL button is inactive.
07154 LABELS. CUSTOM RGB. FOUR BRIGHTNESS LEVELS.
Label each physical button for the equipment it controls. Choose panel backlight colors to suit your cabin, then adjust among four brightness levels for daylight or night driving. Custom on, off and warning colors help you recognize switch status before you press. The app adds names, icons and photos for its own controls.
Daytime color reference. Select Night to compare 0%, 30%, 60% and 90% brightness.
Choose a higher backlight setting to suit brighter cabin conditions. Four manually selected levels: 0%, 30%, 60% and 90%.
Manual panel-brightness control
Red status-color preview. Set your on, off and warning colors in the app. Brightness changes apply to the panel backlight, not connected accessory brightness.
08ADJUSTABLE LOW-VOLTAGE CUTOFF
An evening of camp lighting can add up. Enable low-voltage protection and choose a cutoff threshold in the app. If voltage falls below it, the system warns you and cuts power to connected accessory outputs, helping limit further accessory drain. The control box stays powered.
Enable low-voltage protection and set a threshold in the app. Below it, LOCUS warns you and cuts accessory outputs while the control box remains powered.
TRY A LOW-VOLTAGE SCENARIO
Normal operation
Illustrative values and sequence. Choose a threshold suitable for your battery and application.
Connect voltage-detection wires to battery positive and negative as shown in the guide. A cutoff limits accessory drain; it does not guarantee engine restart.
09CENTRALIZED CONNECTIONS. SERVICEABLE HARDWARE.
Planning a switch panel for your truck or 4x4? Choose a fixed or angle-adjustable panel bracket, then place the control box where its connections remain accessible. The fused battery lead, replaceable channel fuses and dedicated DRL terminals bring your accessory wiring together. Check supply voltage, circuit loads, mounting clearance and vehicle-signal compatibility before installation.
A SYSTEM BUILT AROUND YOUR ACCESSORIES
The eight-gang panel brings your accessory switches together, with dedicated power, group, brightness and DRL controls.
Plan for accessory-specific wiring, mounting clearance and any vehicle-specific parts your installation requires.
A covered box and cable seals help organize and cover the accessory connections.
Service the channel fuses when needed. Use the specified replacement rating; never increase it to add capacity.
Choose a fixed or angle-adjustable panel bracket and position the controls for comfortable reach.
Review the battery connections, ACC/BAT selection, sensor wires and dedicated DRL terminals before installation. Route wiring securely and match every accessory to its supply voltage and channel rating.
10THE DETAILS, IN ONE PLACE
| Main outputs | 8 |
|---|---|
| Input voltage | 12–24V DC |
| Total system current | 120A maximum |
| Highest-rated output | 40A on CH1 |
| Individual channel limits | 40 / 30 / 15 / 15 / 10 / 20 / 20 / 30A |
| Power at 12V | 1440W |
| Panel dimensions | 5.1 × 2.8 in |
| Operating temperature | −40°F to 221°F (−40°C to 105°C) |
|---|---|
| Switch modes | Toggle / Momentary / Flash / Strobe |
| Strobe choices | 8 patterns |
| Vehicle-signal inputs | 3 configurable wired inputs |
| Panel backlight | RGB; 4 manual levels: 0%, 30%, 60%, 90% |
| Label stickers | 154 |
| Live app readings | System voltage, current and internal board temperature |
Individual channel ratings and the 120A total system limit apply together. Sensor and accessory compatibility depend on the vehicle and connected equipment.
11LOCUS / OTHER PRODUCT
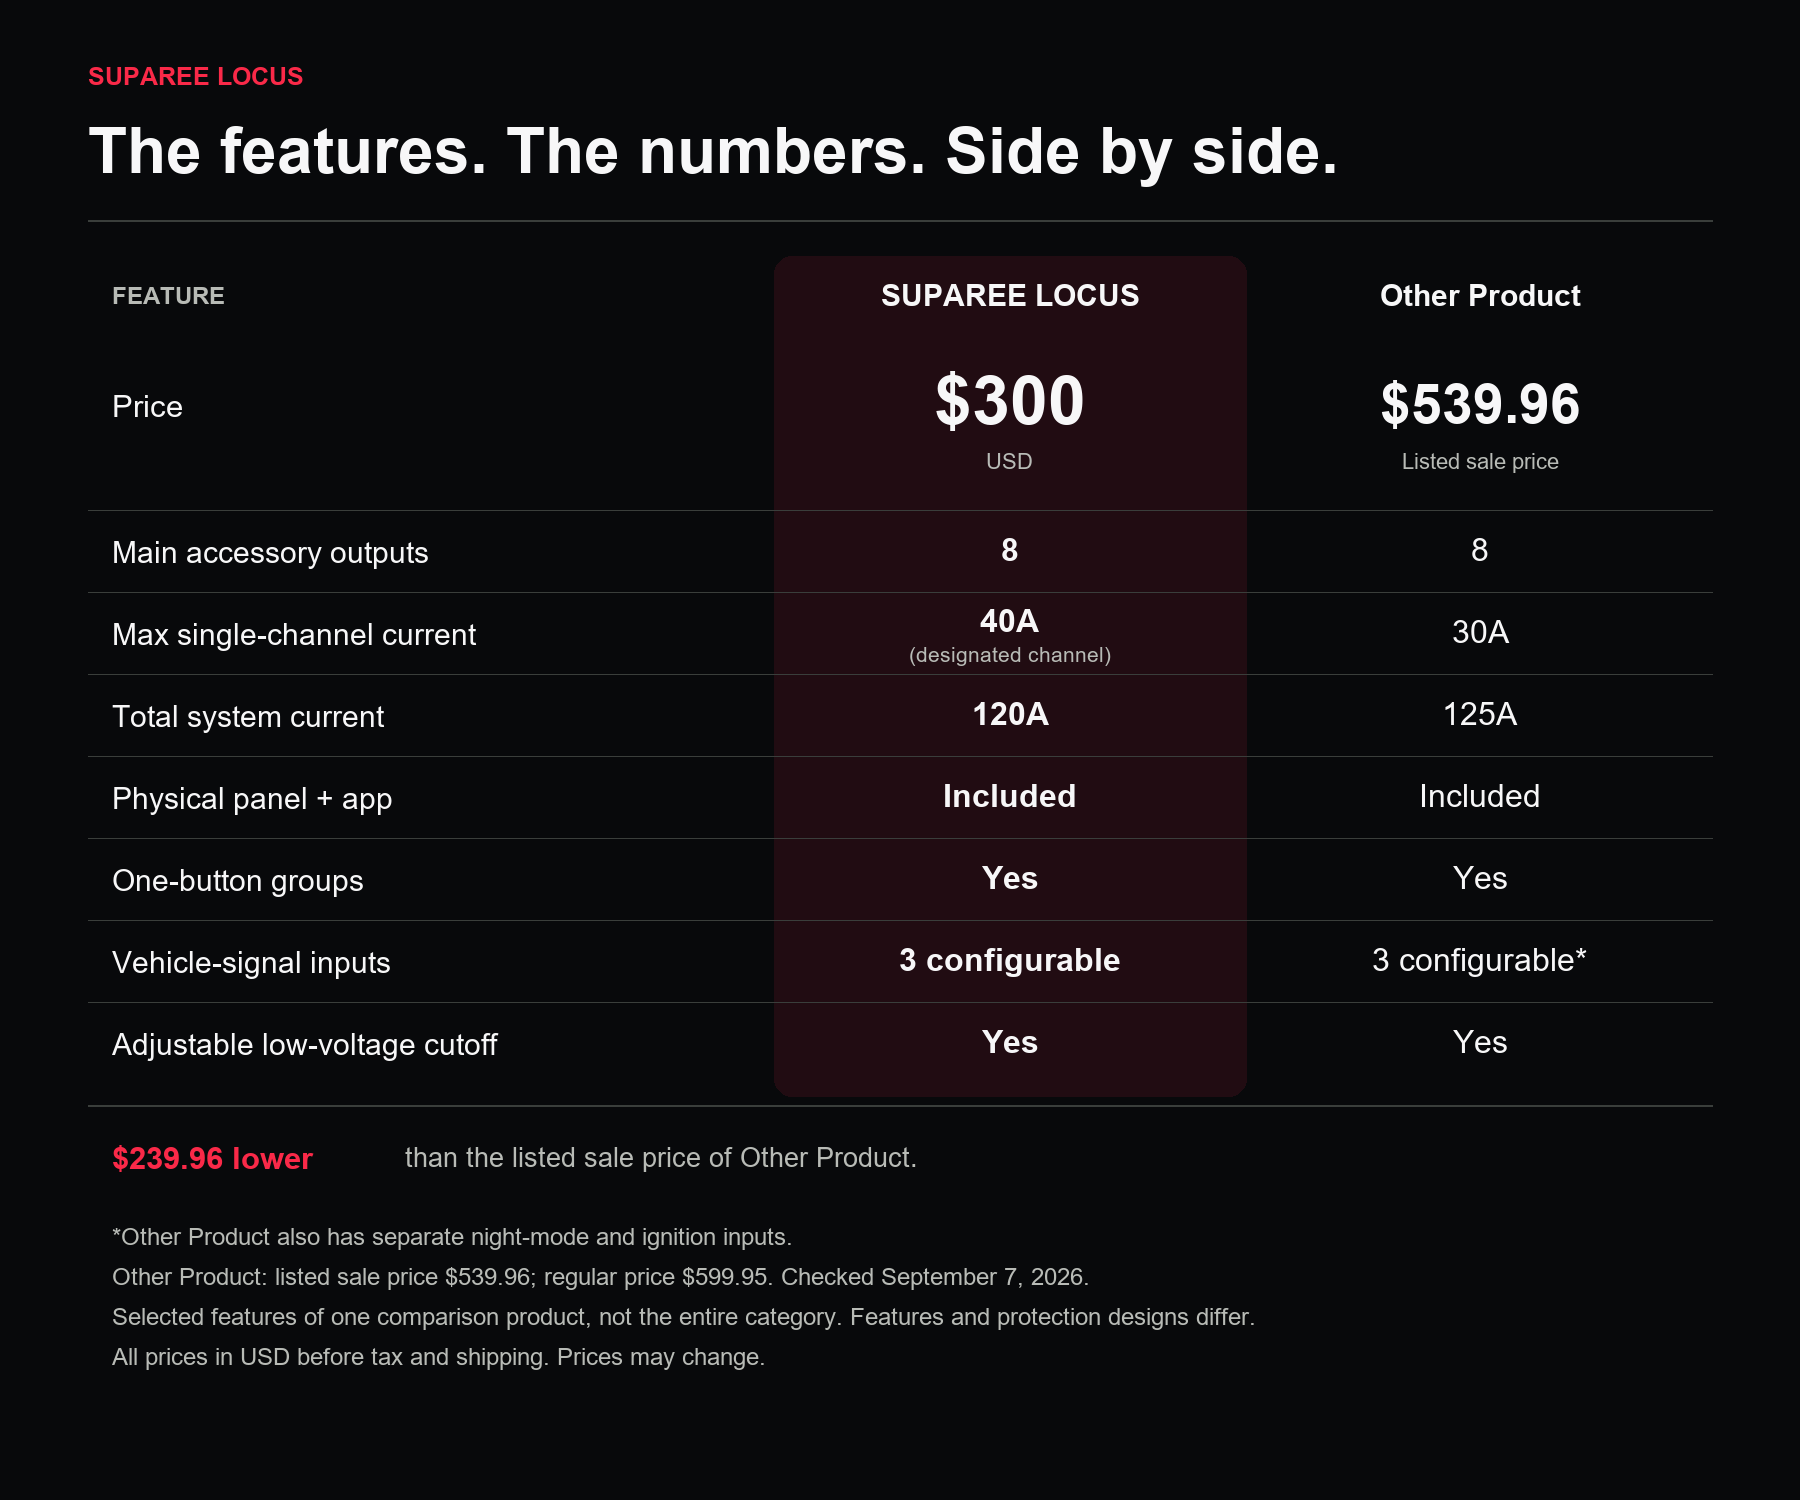
At $300, LOCUS brings panel and app control, multi-output groups, vehicle-signal inputs and adjustable low-voltage cutoff together. Compare those functions alongside the channel ratings and price of one other 8-channel system. The listed prices differ by $239.96.
| Feature | SUPAREE LOCUS | Other Product |
|---|---|---|
| Price (USD) | $300LOCUS 8-Gang Switch Panel | $539.96Listed sale price |
| Main accessory outputs | 8 | 8 |
| Maximum single-channel current | 40A, designated channel | 30A |
| Total system current limit | 120A | 125A |
| Physical panel + app | Included | Included |
| One-button groups | Yes | Yes |
| Vehicle-signal inputs | 3 configurable inputs | 3 configurable inputs¹ |
| Adjustable low-voltage cutoff | Yes | Yes |
Other Product refers to one selected 8-channel system, not the entire category. Selected features only; feature sets and protection designs differ. ¹ Other Product also has separate night-mode and ignition inputs. Price checked September 7, 2026: $539.96 sale, $599.95 regular. USD before tax and shipping; prices may change.
12GET MORE FROM LOCUS
Explore the settings that make SUPAREE's flagship switch panel work around your build.
Build a group around camp, work or the trail.
See how it works ↗TRY THIS WITH LOCUSLink rear-facing lights to a compatible vehicle signal.
See how it works ↗TRY THIS WITH LOCUSUse dedicated DRL control for compatible accent lights.
See how it works ↗26 questions
Build a lighting setup around each part of your day.
Yes. Grouped outputs can share one action or use individual actions. For example, compatible work lights can stay on while another connected light flashes, all from one group command.
Choose Toggle for press-on, press-off operation; Momentary to run an accessory only while you hold the button; or Flash and Strobe for compatible lights. Set the behavior to suit the connected accessory using the panel or app.
The app lets you change the Flash speed and select from eight Strobe patterns. That gives compatible lighting different behaviors without changing its wiring.
Yes. Connect compatible DRL or accent-light circuits to the dedicated DRL terminals and use the separate DRL button. Your main lights stay on their own controls, leaving the eight main outputs available for other accessories.
Yes. Add the DRL channel to a group so your accent lighting responds with the other assigned outputs. While Group Mode is enabled, control DRL through that group; the separate DRL button is inactive.
Let a familiar vehicle control trigger your accessories.
Yes. Connect a sensor input to a compatible high-beam signal and assign the outputs you want it to trigger. Your selected auxiliary lights can then respond when you operate the vehicle's high-beam control. Wiring and app setup are required.
Yes. Wire a sensor input to a compatible reverse signal, then assign your rear-facing lights in the app. Once configured, shifting into reverse can trigger the selected outputs without a separate button press.
Use them to link accessories to compatible vehicle signals. High beams, reverse, brake lights and hazard lights are examples shown in the guide. You choose which signals to connect and which outputs each input controls.
Yes. A sensor input can control several outputs using a shared action or individually assigned actions. Configure each connected light's response in the app to build the behavior you want from that signal.
LOCUS uses a fixed priority when multiple sensor inputs trigger the same output at once: Sensor 1 takes priority over Sensor 2, then Sensor 3. Assign the signal you want to take precedence to the higher-priority input during setup.
Make the controls easier to recognize and use.
No. Use the physical panel for everyday accessory control, including its power, brightness, DRL and group buttons. Open the app when you want additional configuration options or a live view of system readings.
Yes. Choose from 154 supplied label stickers to identify the equipment on your physical panel. Clear labels help you find the right light or accessory at a glance as your build changes.
Yes. Rename app buttons, choose a built-in icon, or add a photo from your camera or photo library. You can make the app's controls match your actual equipment; the physical panel uses label stickers.
Yes. Manually choose from four panel-backlight levels: 0%, 30%, 60% and 90%. Turn it up for daytime visibility or lower it after dark. This adjusts the panel lighting, not the brightness of connected accessories.
Yes. Customize the panel's on and off colors and brightness in the app, then choose a separate warning color. You can match your cabin's lighting and make switch states easier to recognize.
The app displays live system voltage, current and internal control-box temperature. Use these readings to check the system as your connected equipment runs. Current is presented as a system reading, not a separate reading for each output.
It measures the control box's internal circuit-board temperature, so you can check conditions inside the unit. Choose Fahrenheit or Celsius in the app. It does not report outside or cabin temperature.
Plan your connections, power limits and mounting position.
Match each accessory to its channel rating: CH1 40A, CH2 30A, CH3 15A, CH4 15A, CH5 10A, CH6 20A, CH7 20A and CH8 30A. The combined system limit is 120A. Both the individual rating and total limit apply at the same time.
Yes. LOCUS accepts 12–24V DC input, so it can serve as a 12V switch panel or work with a compatible 24V system. Connected accessories must match the supply voltage, and both individual channel ratings and the 120A combined limit still apply.
Yes. Enable low-voltage protection in the app and set your cutoff threshold. If voltage drops below it, LOCUS warns you and cuts accessory output power, helping limit further accessory drain at camp. The control box stays powered; this does not guarantee the engine will restart.
Connect the voltage-detection wires to the battery's positive and negative terminals as shown in the wiring guide. The app needs these connections to display a voltage reading, so include them when setting up voltage monitoring and low-voltage protection.
It selects ACC or battery operation for the control box. Choose the setting that matches your planned installation and complete the corresponding connections in the wiring guide.
LOCUS supports compatible 12–24V accessory installations. Fixed and angle-adjustable brackets help you position the panel within reach; the guide shows dashboard, overhead and center-console examples. Check mounting clearance, secure attachment, accessory loads and vehicle-signal wiring for your specific build.
Yes. The channel fuses are replaceable, making the system serviceable after a fuse opens. Use the same or a lower amperage rating as the original fuse, as the guide specifies. Never fit a higher-rated fuse to increase a channel's capacity.
No matching questions. Try a different keyword or topic.
SUPAREE'S FLAGSHIP SWITCH PANEL
Bring your off-road lighting and compatible accessories together with the SUPAREE LOCUS 8-gang switch panel. Plan your outputs, create your lighting groups and choose how each switch responds. From trail lighting to work lights at camp, make the controls work around your build.